With pallet Revive, it’s possible to work with both ink!v6 contracts and solidity contracts.
The PAPI ink! SDK simplifies working with ink!v6 contracts by providing fully-typed interactions and streamlining common actions.
However, there’s little information in this community on how to work with solidity contracts. This post aims to fill that gap.
Call paths
With revive, there are two possible ways to interact with a contract:
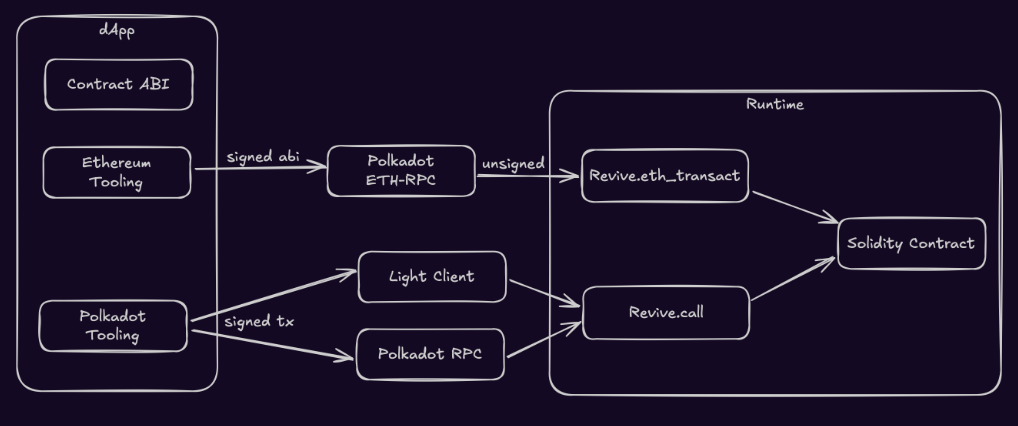
Diagram extracted from Polkadot Blockchain Academy. MIT
- Through a Polkadot ETH-RPC
In this case, you create an ethereum transaction using ethereum’s tooling (libraries and signers) targeting an ETH-RPC, a polkadot node that exposes a set of ethereum-compatible RPC methods.
This RPC receives the ethereum transaction and submits it to the runtime through the call Revive.eth_transact. The Runtime then reads this transaction and maps it to the appropriate call: Revive.eth_instantiate or Revive.eth_call.
This path is best suited for migrating existing apps or to provide an ethereum-like experience (e.g. allowing users with an ethereum signer like MetaMask to use your application without needing to get a polkadot wallet).
- Through regular pallet calls
The other option is to use polkadot tooling. Here, you can still use ethereum libraries to encode and decode the ABI call data, but you submit the call with a polkadot signer and a standard polkadot RPC provider.
This method also supports light client (i.e. smoldot), making your interaction trustless.
This post focuses on this path. Let’s dive in.
Example source
I’ve prepared a GitHub repo with a CLI example to deploy, query and interact with a solidity smart contract.
It uses the example contract 3_Ballot.sol from the Remix IDE. This contract sets up proposals for voting, allows users to cast a vote, and determines the winning proposal.
Generating ABI and code
The first step is generating the ABI and bytecode from your solidity contract. The bytecode in this case must be PVM, as revive requires. To do so, you can use revive’s compiler resolc.
This compiler is distributed via GitHub releases as executable binaries and also as the npm package @parity/resolc, which is often more convenient. To compile a solidity contract into the ABI and PolkaVM binary:
# generate the ABI
npx @parity/resolc --abi ./path_to_contract.sol

# generate the PVM Bytecode
npx @parity/resolc --bin ./path_to_contract.sol
For fully-typed interactions, ethereum libraries like viem need the ABI formatted in typescript. You can generate this using npx @wagmi/cli generate (after some setup), or you can paste the ABI manually into a typescript file:
export const contractAbi = /* paste ABI content here */ as const;
In the example repo, this is handled by the bun codegen step
Deploying the contract
There’s one important detail for any interaction with a solidity contract: The contract data must be ABI-encoded. Polkadot uses SCALE, which is more efficient, but solidity contracts only understand ABI.
The resulting polkadot transaction is still SCALE-encoded (since that’s what the runtime expects), but inside it contains a field data: Vec<u8> that HODLs the ABI-encoded call data that the contract will read.
For this, we can combine:
- a Polkadot library to build the runtime interaction (here we use polkadot-api, aka PAPI, though others work as well)
- an Ethereum library to encode and decode the ABI data (we use viem)
In the example repo, you can run it with bun run deploy {account name}. See the source in src/deploy.ts
Let’s start by encoding the constructor data into ABI format using viem:
import { encodeDeployData, toHex } from "viem";
import { ballotAbi } from "./generated";

// Constructor takes an array of 32-byte strings. Utility to pad it
const titleToHex = (title: string) =>
  toHex(title.slice(0, 32).padStart(32, " "));

const data = encodeDeployData({
  abi: ballotAbi,
  args: [[titleToHex("Proposal A"), titleToHex("Proposal B")]],
  // In revive, the code is uploaded separately. We can leave bytecode empty
  bytecode: "0x",
});
Now, on the polkadot side, assuming we already have polkadot-api set up and the bytecode loaded, the next step is to call Revive.instantiate_with_code.
That call requires parameters for the max weight (gas) and storage deposit limits, which essentially define the maximum amount we are willing to spend. We could pass an arbitrary large value if we don’t mind paying whatever is required, but we can also get the runtime to obtain the actual required values:
const { gas_required, storage_deposit } =
  await typedApi.apis.ReviveApi.instantiate(
    account.address,
    0n, // transferred value
    undefined, // gas limit
    undefined, // storage deposit limit
    {
      type: "Upload",
      value: pvmBytes,
    },
    Binary.fromHex(data),
    undefined // salt
  );
Finally, we are ready to create the transaction, sign it with a polkadot signer, and submit it:
typedApi.tx.Revive.instantiate_with_code({
  value: 0n,
  gas_limit: gas_required,
  storage_deposit_limit: storage_deposit.value,
  code: pvmBytes,
  data: Binary.fromHex(data),
  salt: undefined,
}).signAndSubmit(account.signer);
The key point here is that the data field is ABI-encoded, and this is what the solidity contract constructor will receive. The transaction itself, however, remains SCALE-encoded, which is what the runtime uses to decode, verify, and execute the call.
Interacting with the contract
Interacting with the contract follows the same principle as deploying: the contract data must be ABI-encoded, while the Polkadot call itself must be SCALE-encoded.
There are two main use cases here: querying data and submitting a transaction. Submitting a transaction is roughly the same as deploying a contract, except that you don’t need the bytecode and you call Revive.call instead. An example can be found in the repository at src/vote.ts, but we will skip it in this post since it is very similar and would only add length without introducing new concepts.
Instead, let’s look at querying, as this introduces the additional step of decoding the result. We will query the function winningProposal, which returns the index of the winning proposal. The corresponding example in the repository is in src/winning.ts.
To query, we call the Runtime API in the same way as before:
import { encodeFunctionData } from "viem";
import { ballotAbi } from "./generated";

const data = encodeFunctionData({
  abi: ballotAbi,
  functionName: "winningProposal",
  args: [],
});

const callResult = await typedApi.apis.ReviveApi.call(
  account.address,
  Binary.fromHex(contractAddress),
  0n, // transferred value
  undefined, // gas limit
  undefined, // storage deposit limit
  Binary.fromHex(data)
);

if (!callResult.result.success) {
  throw new Error("Query failed");
}

const data = callResult.result.value.data;
The result we receive is once again ABI-encoded. To decode it, we can use viem:
import { decodeFunctionResult } from "viem";
import { ballotAbi } from "./generated";

const winningIdx = decodeFunctionResult({
  abi: ballotAbi,
  functionName: "winningProposal",
  data: data.toHex(),
});
Closing thoughts
From the perspective of runtime interactions, working with a Solidity contract is not very different from working with an ink! contract. The only part that changes is how the contract data is encoded (ABI vs SCALE).
Now how you generate that data depends on the library you use. Currently the PAPI ink! SDK focuses on ink! and pallet Revive. We may add full support for Solidity ABI in the future (especially if there is demand for it), but for now you can rely on any existing ethereum library to generate the ABI-encoded data, and then use polkadot-api to query the Runtime API or submit the transaction.
I hope this post helps existing polkadot devs get started with solidity in revive. Feedback is greatly appreciated!
Víctor Oliva
Polkadot-API